What is the Produce Items button?
The button is a functionality in the Product Levels add-on that allows items to be produced through their linked Bill of Materials (BOM). Production will add the product to stock and deduct the stock of the materials in the BOM according to its recipe.
Items can be produced in many ways with this new functionality. However, a product must always have linked BOMs and the option "Produce items according to BOM" enabled.
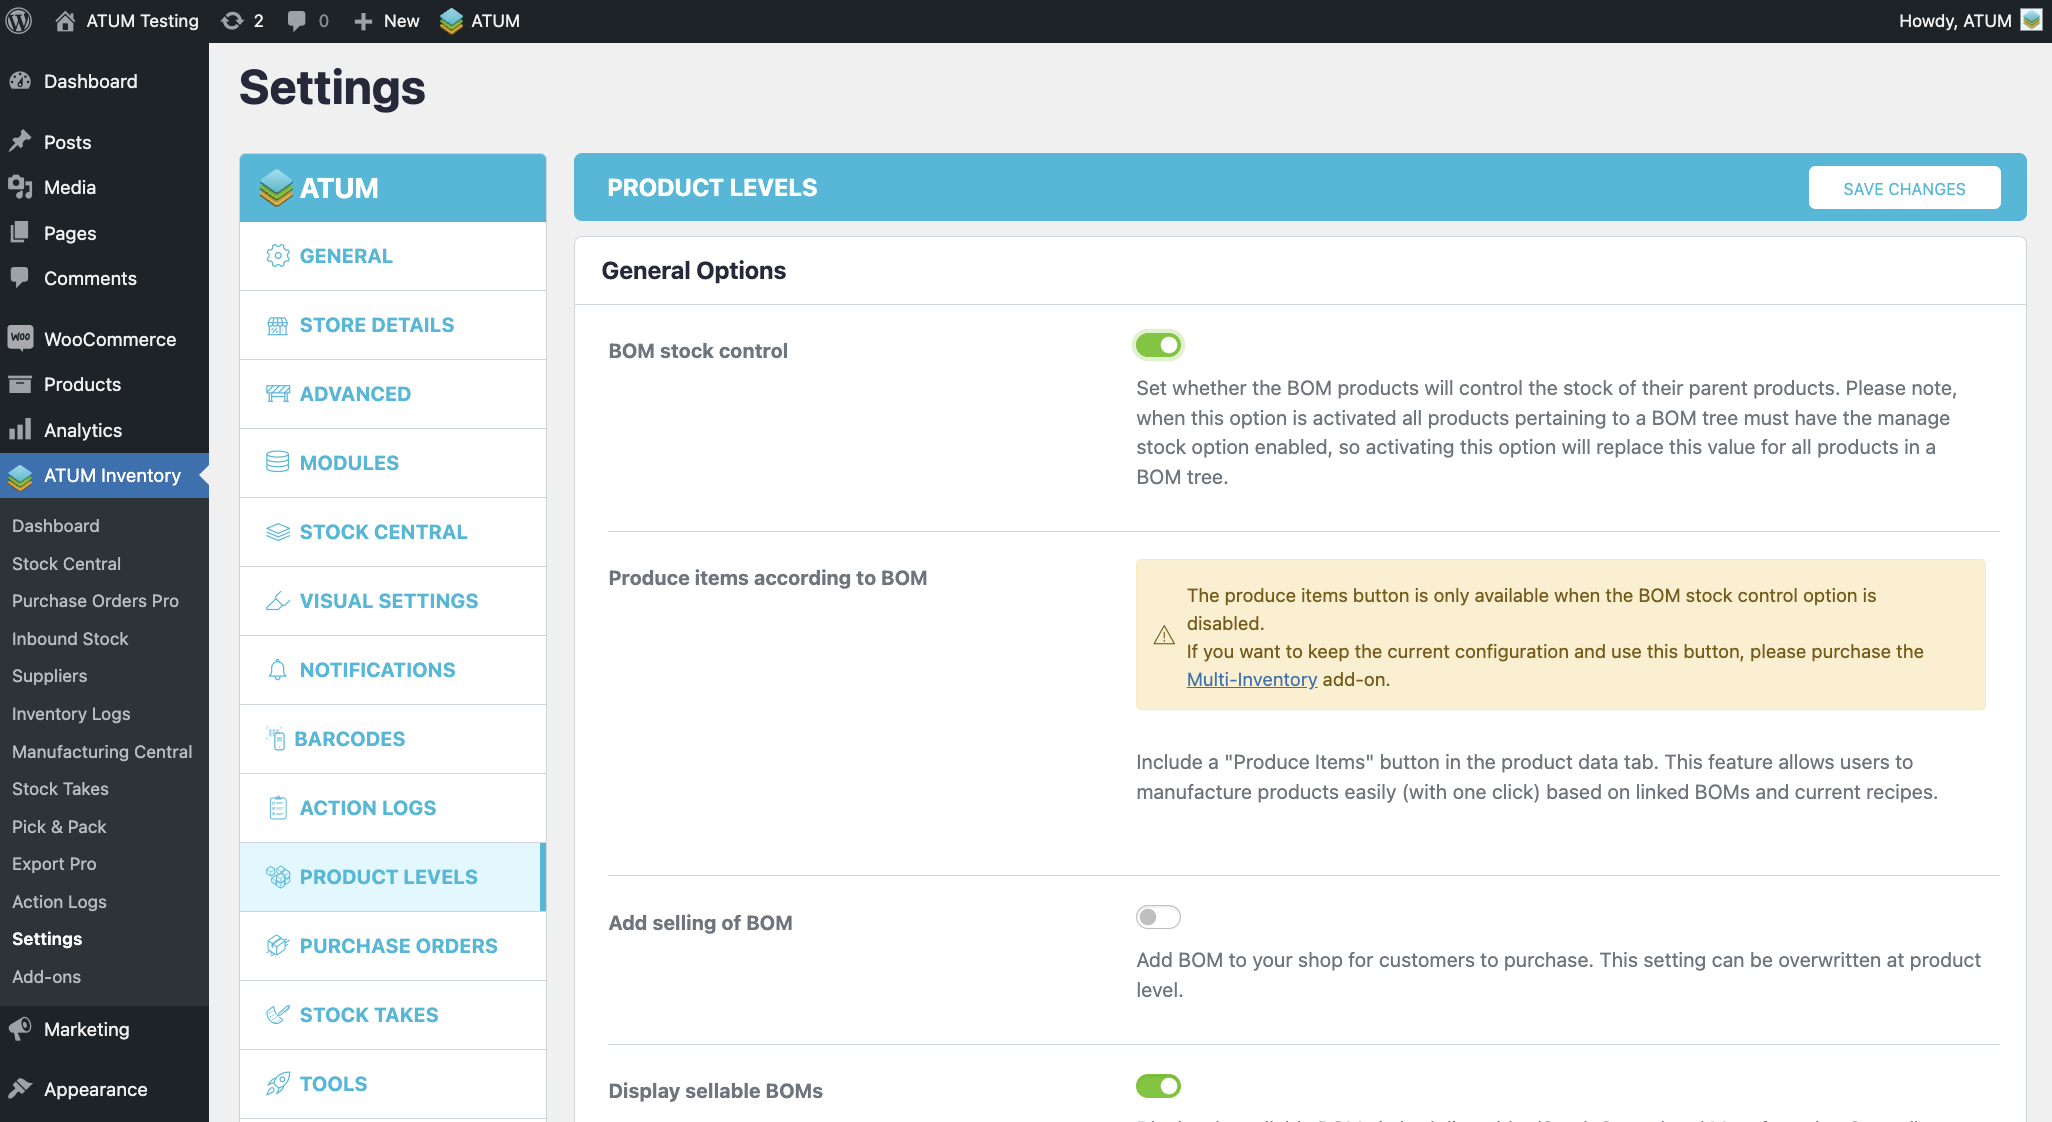
How to enable “Produce items according to BOM”?
On the WordPress admin panel, go to ATUM Inventory > Settings > Product Levels
Enable the option “Produce items according to BOM”.

This is done to avoid deducting the BOMs' stock twice.
Click SAVE CHANGES.
Scenario 1
A site with the "Produce items according to BOM" enabled and the "BOM stock control" disabled. And also, the Multi-Inventory add-on is not installed
With this configuration, the Produce Items button appears on the Bill of Materials tab within the product data section.
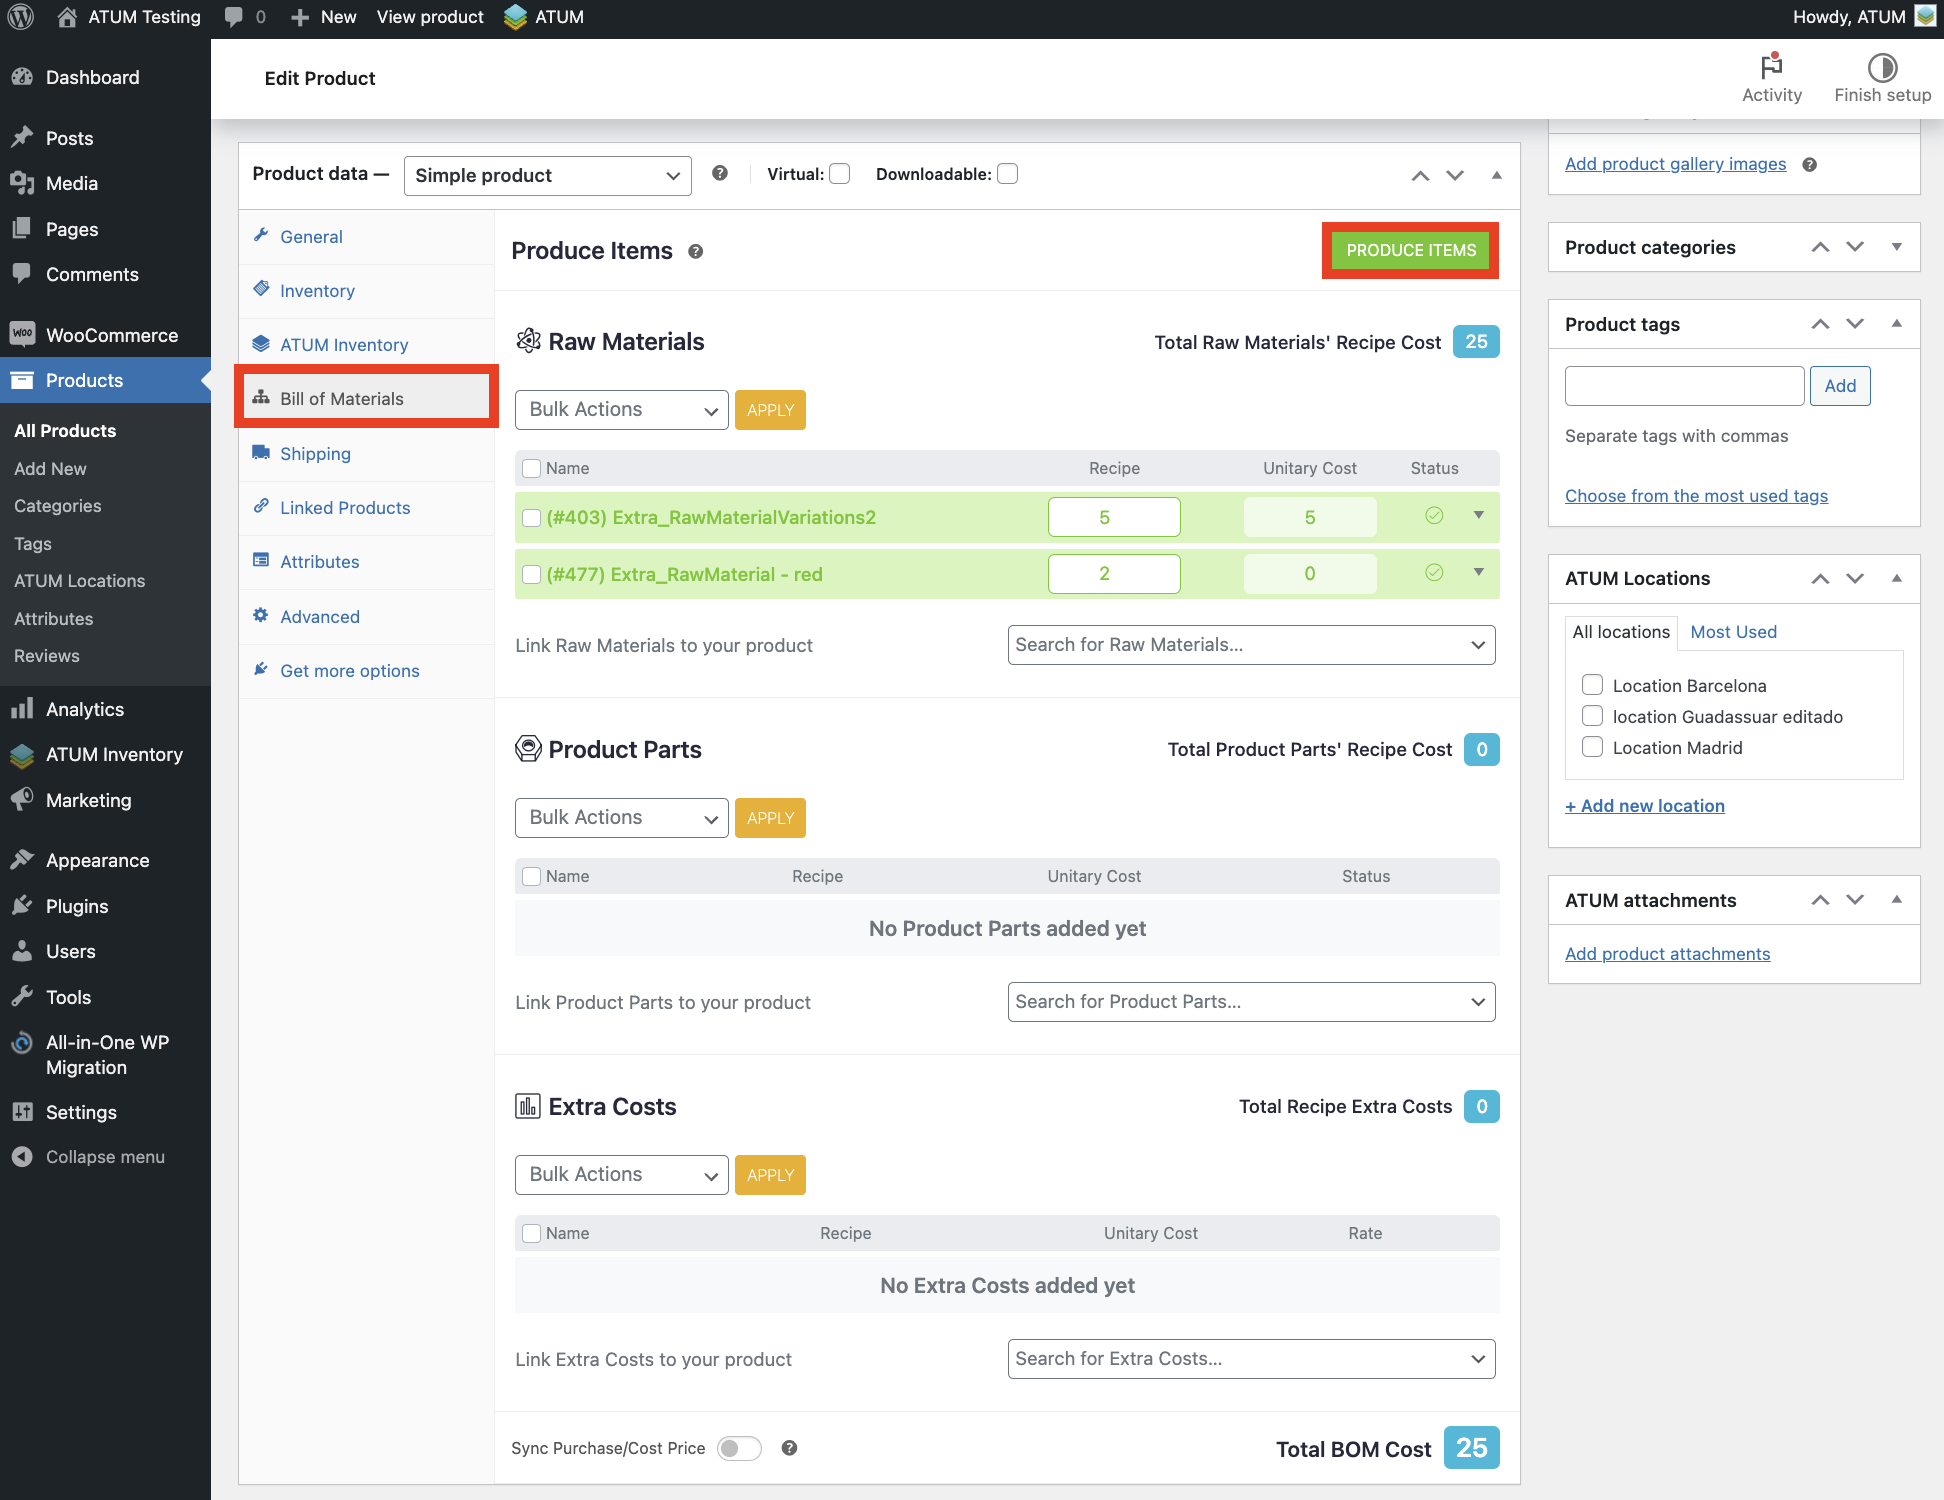
To start the production, click the "Produce Items" button.
A pop-up window will appear:
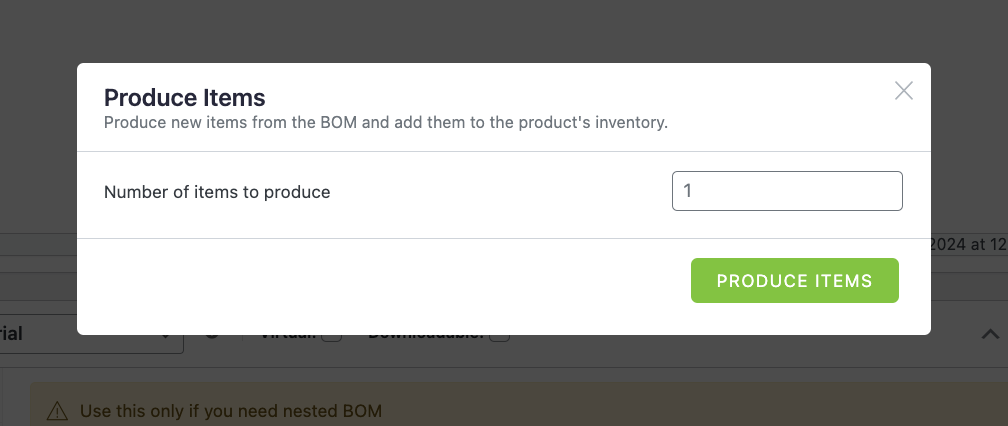
Enter the number of items to be produced and click the “Produce Items” button.
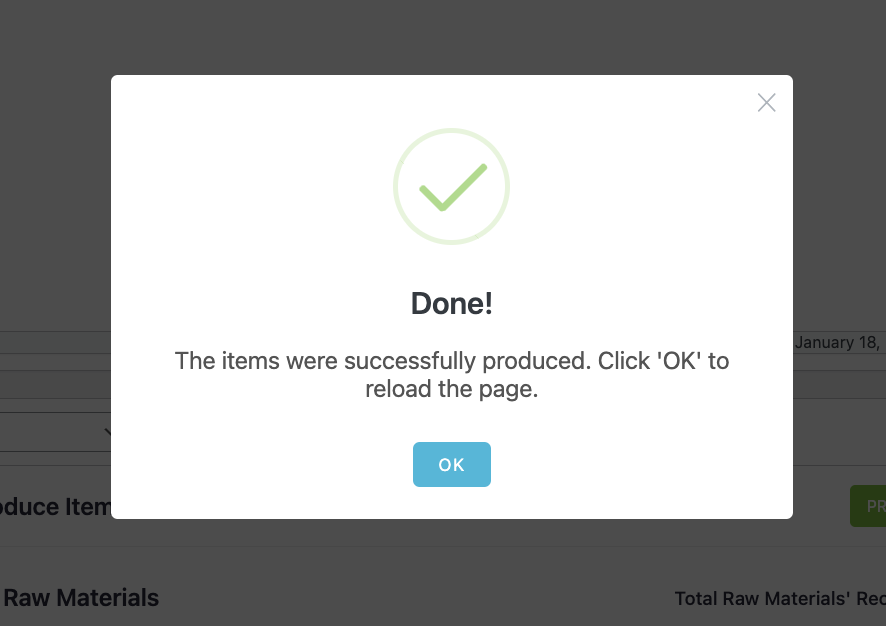
When you click this button, a new pop-up will show up indicating that the items have been produced successfully.

BOM Stock Control option
There is a setting that allows BOM products to control the stock of their parent products. If this option is enabled and all products of a BOM tree have “Manage Stock” enabled, the parent product will show the stock calculated according to the stock of the linked BOM.
If you attempt to enable this option under this scenario, the following pop-up will appear:
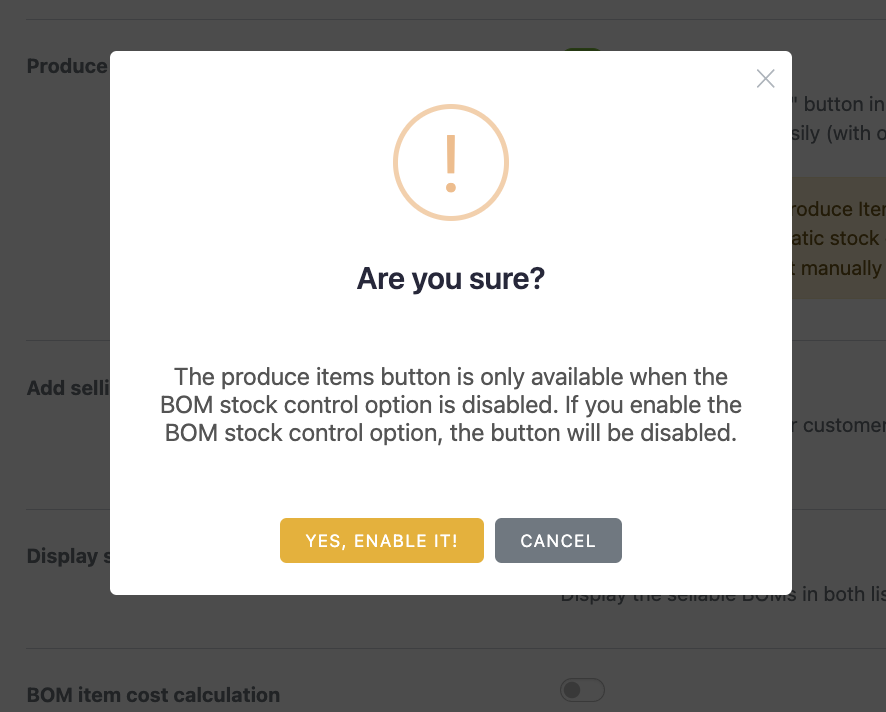
Clicking “Yes, enable it!” automatically disables the “Produce items according to BOM” option. A message will appear advising you to purchase the Multi-Inventory add-on if you want to produce items this way.
If this add-on is installed and activated, the “BOM stock control” and “Produce items according to BOM” options can both be enabled without any inconvenience.
The following link provides more information about Multi-Inventory: https://stockmanagementlabs.crunch.help/en/atum-multi-inventory
Scenario 2
A site with the "Produce items according to BOM" enabled and the "BOM stock control" enabled. And also, the Multi-Inventory add-on installed and active.

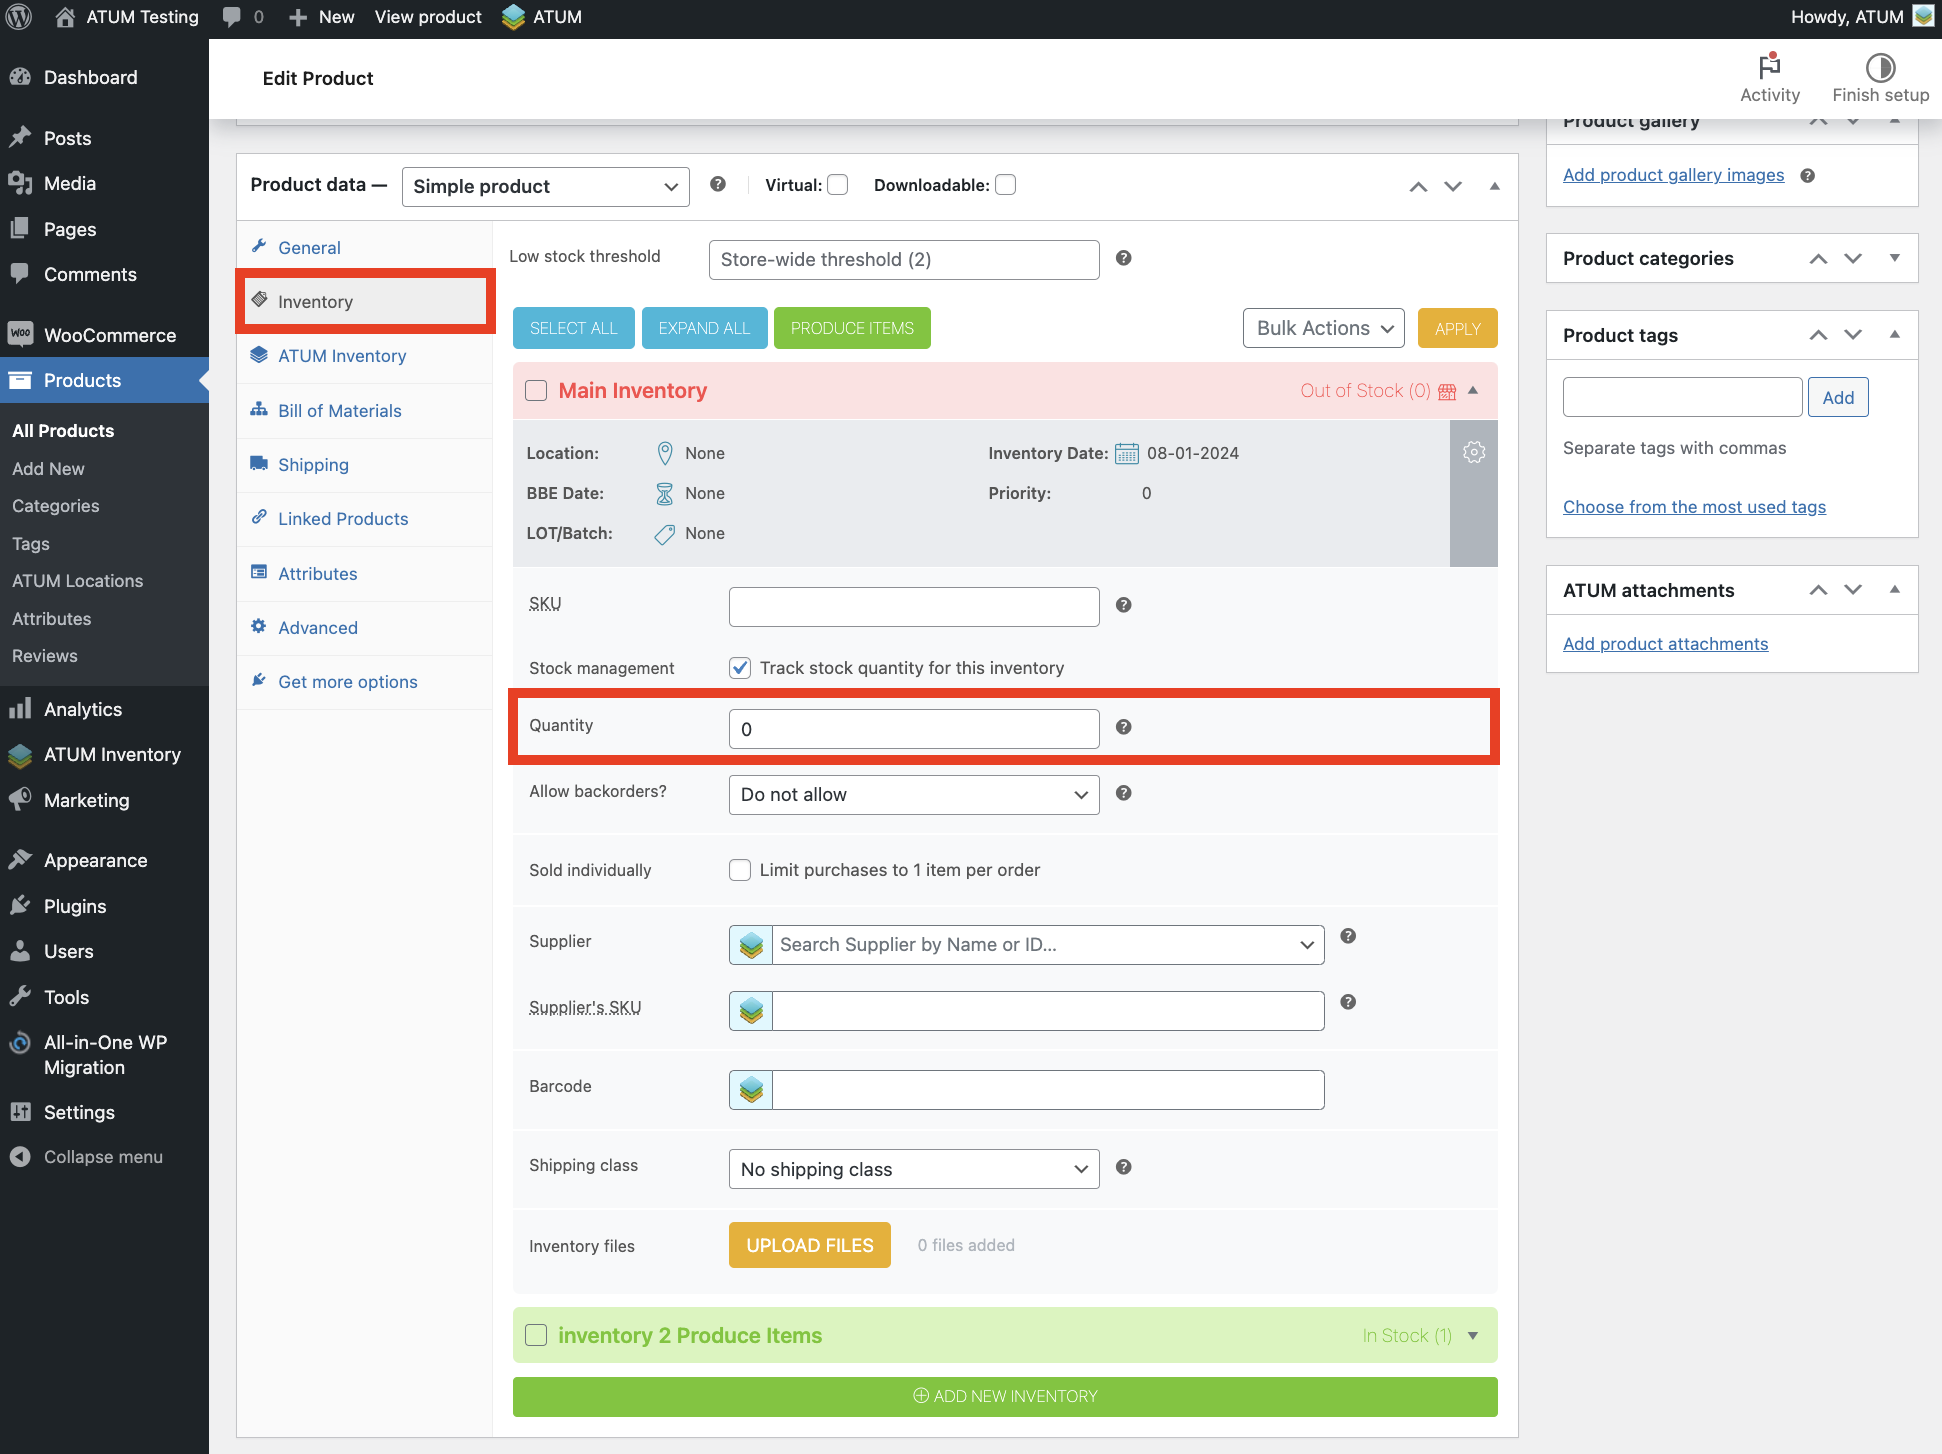
In this case, the Produce Items button is found in the Inventory tab in the product data section.
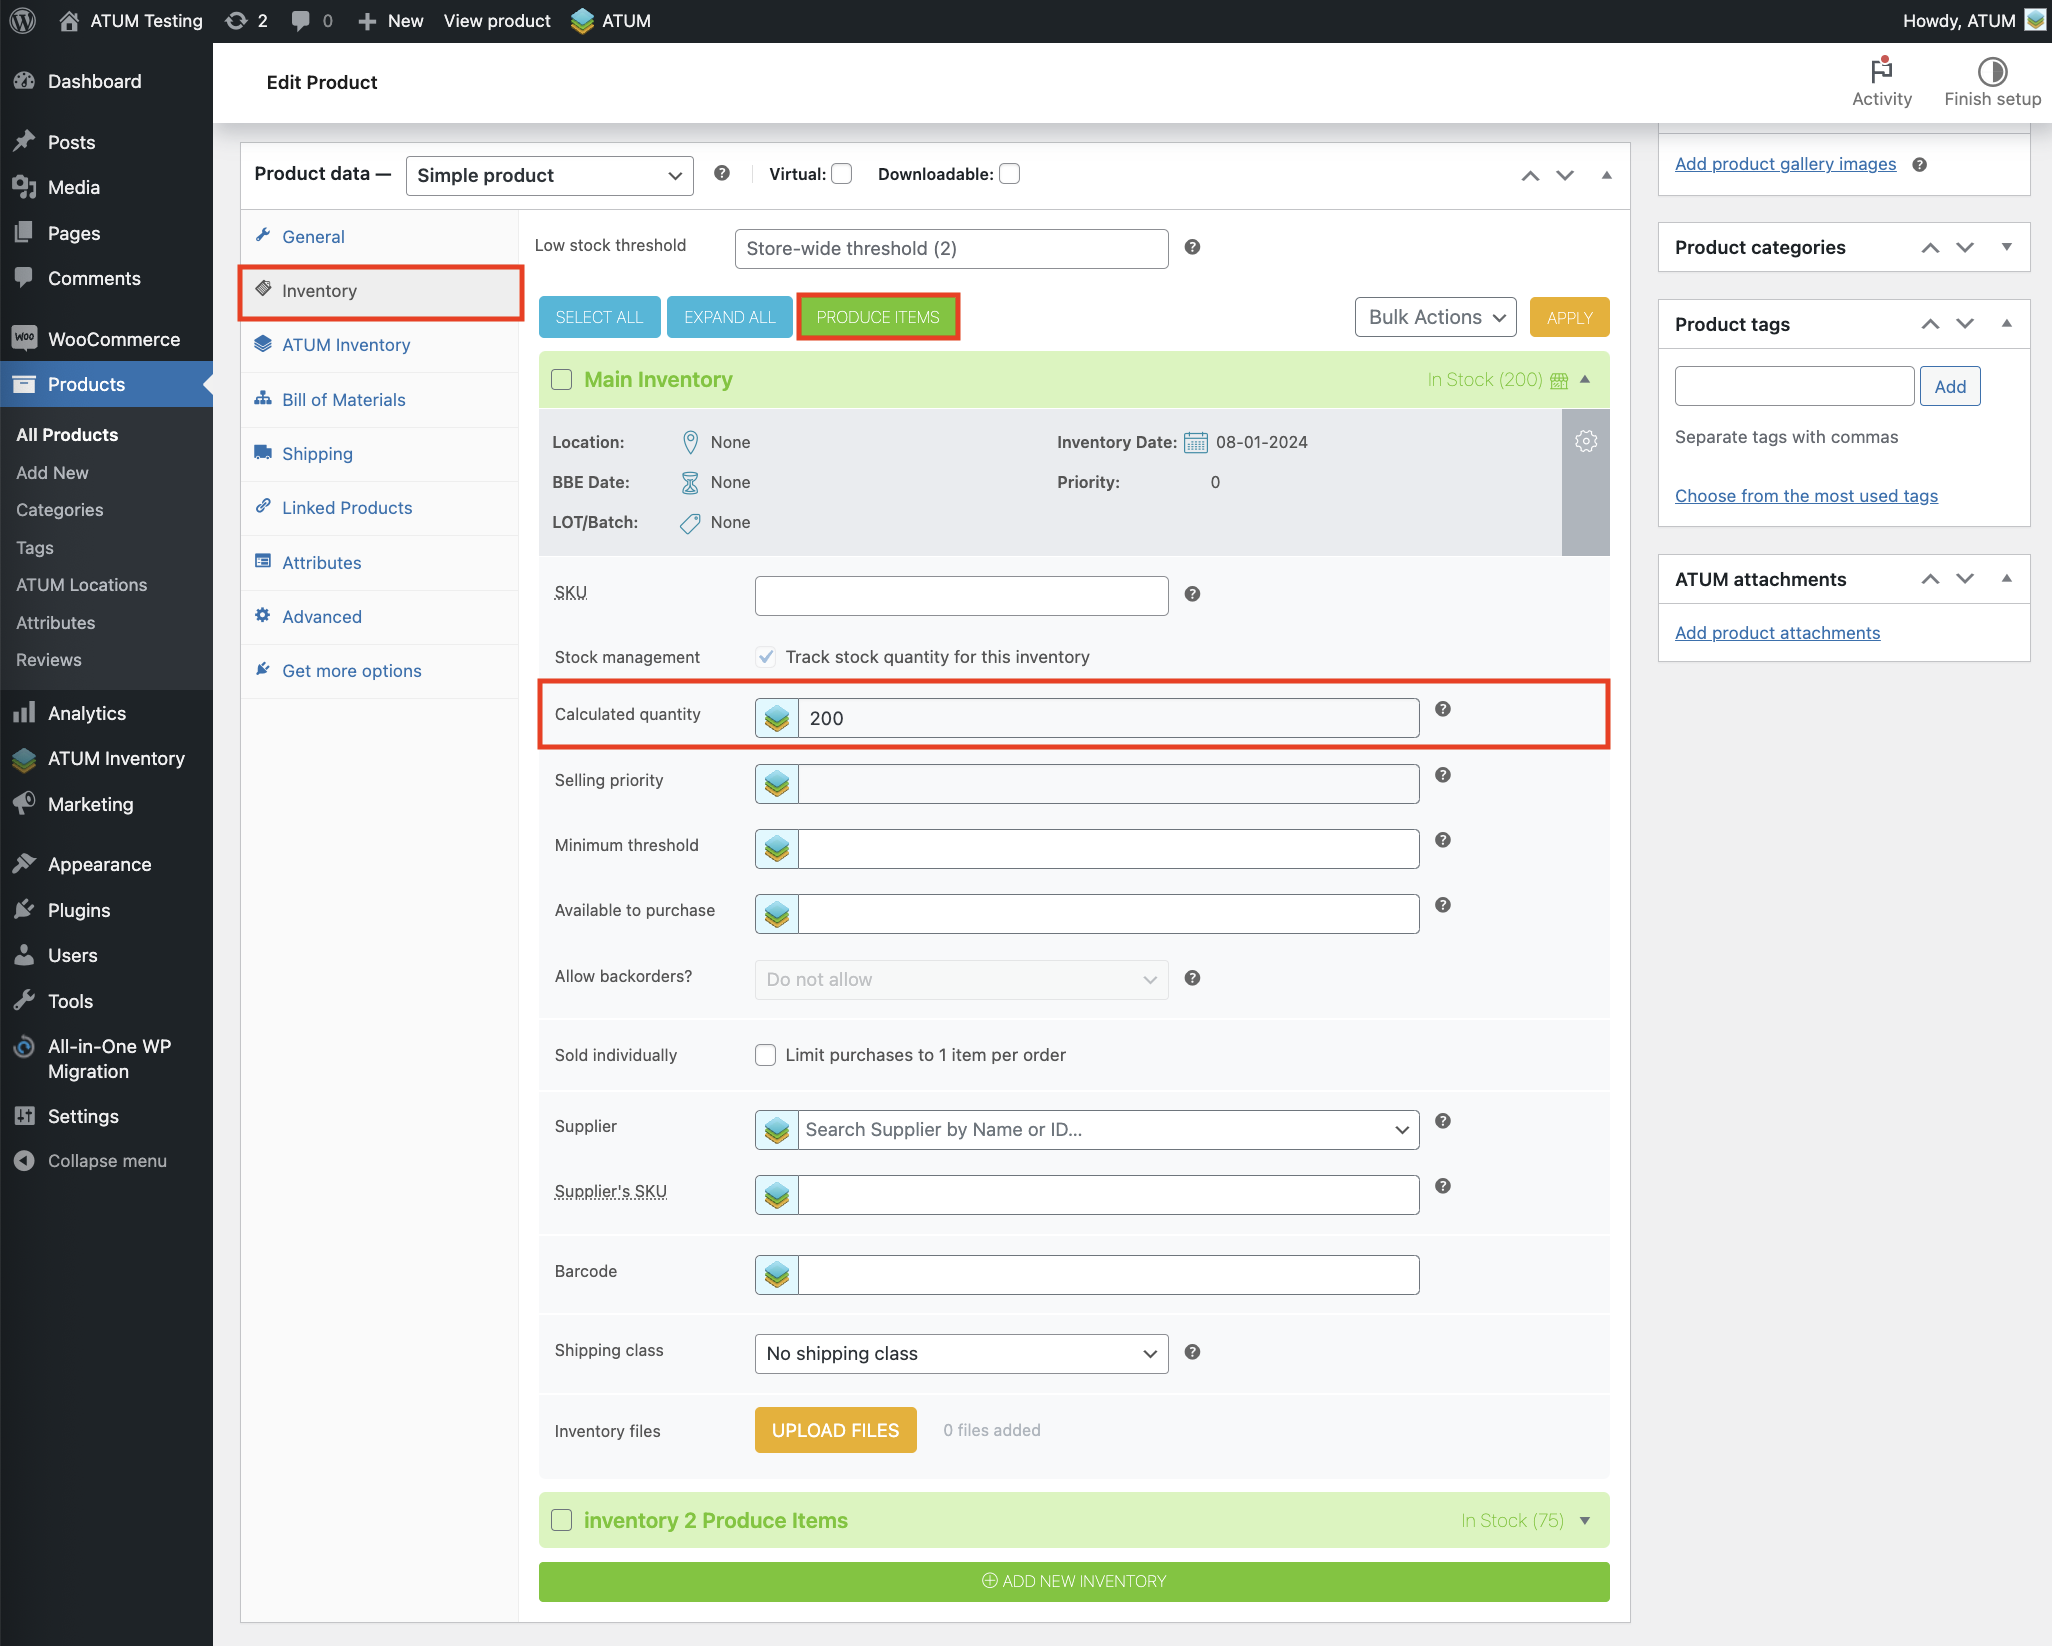
Please note that if the BOM stock control is enabled, the stock of the parent product in the Main Inventory is calculated, not real. This stock will depend on the stock of the whole BOM tree and the recipes set for its linked BOMs.
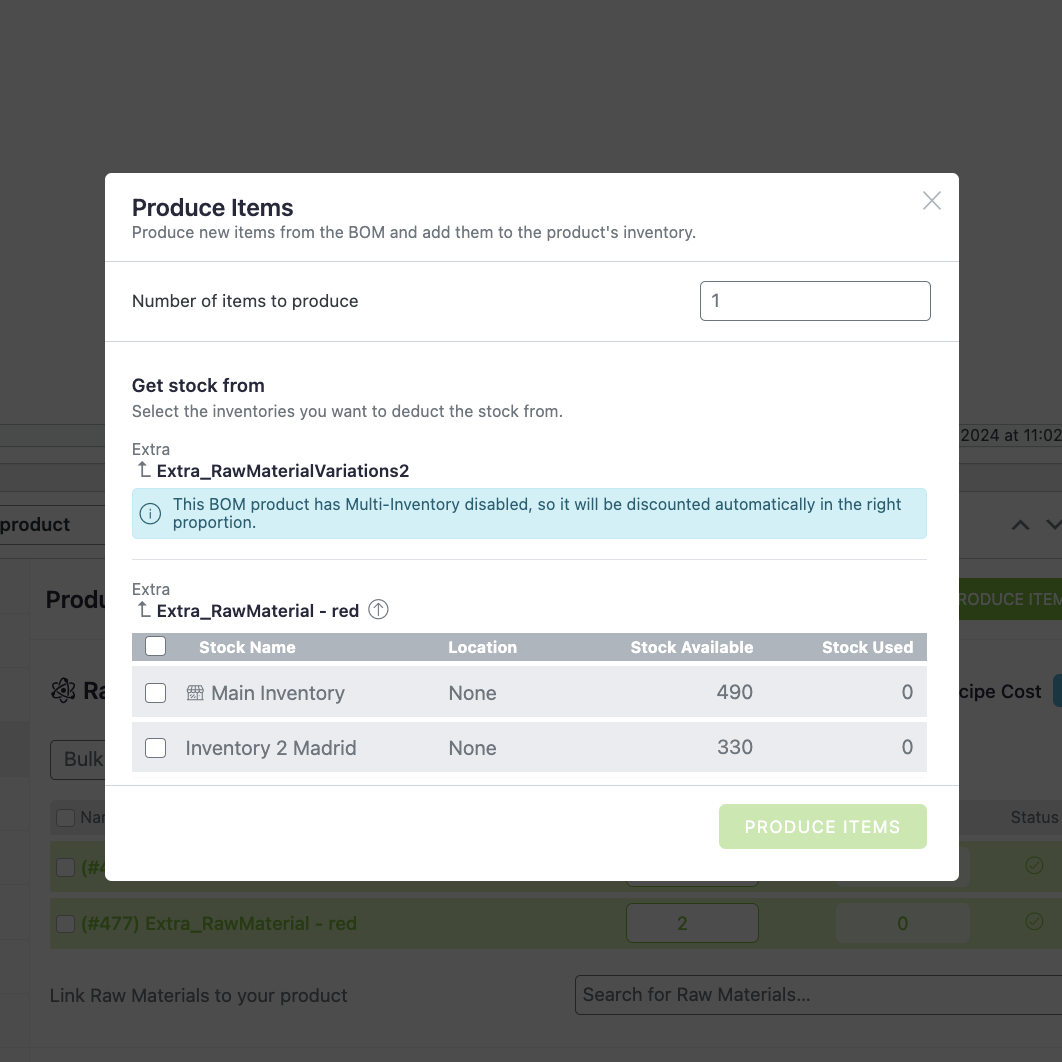
Clicking the Produce Items button will display the following pop-up:

In the field at the top, enter the number of new items you want to produce.
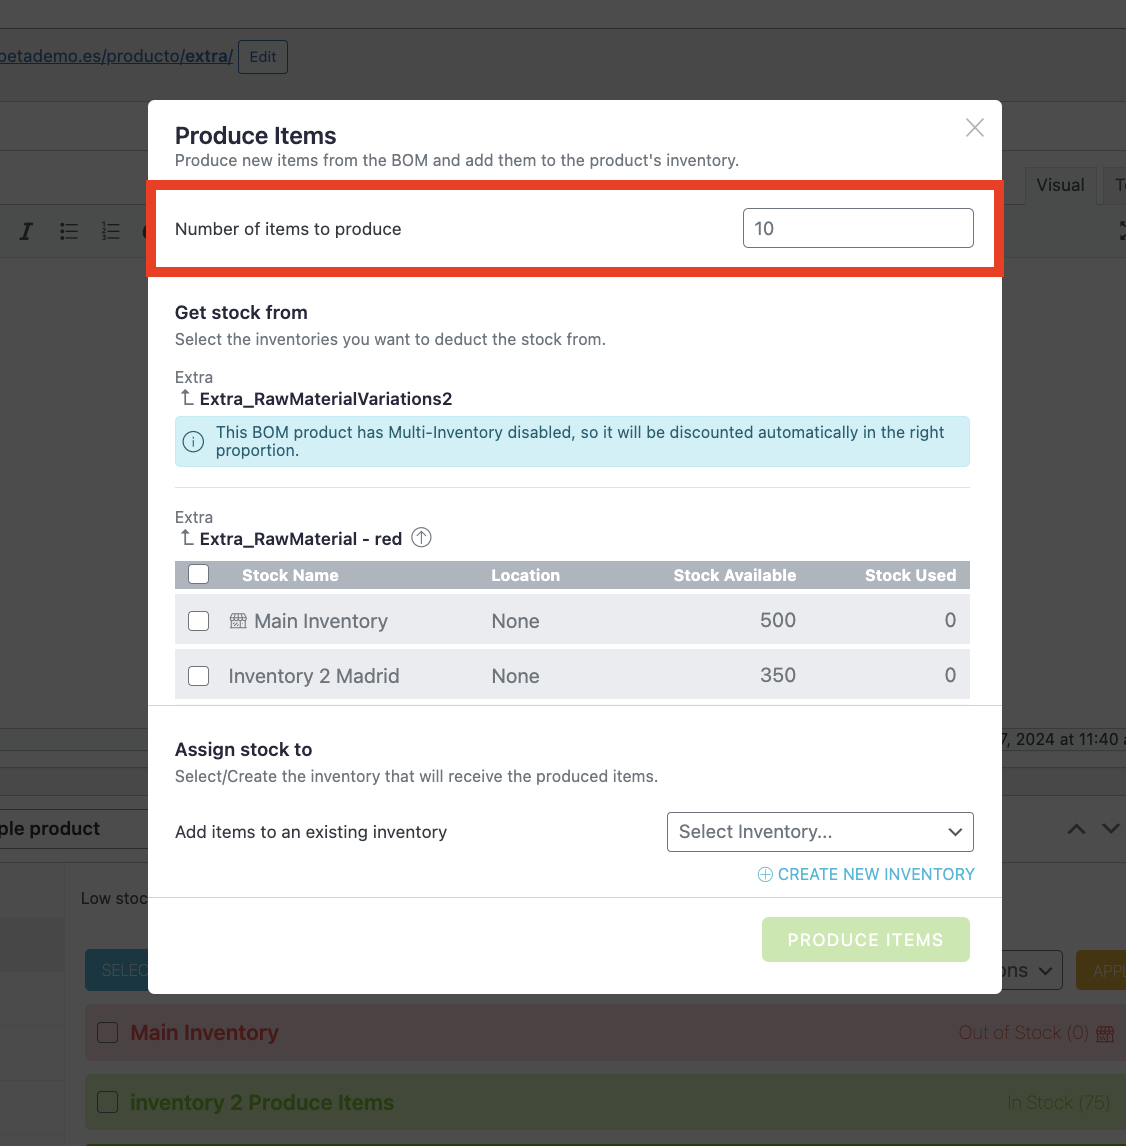
The next section shows you all the linked BOMs of the product with their corresponding recipes so you can decide which inventories (if any) to use for the production. If multi-inventory is not enabled for some of the linked BOMs, it will notify you that the stock of this BOM will be automatically deducted in the correct number (according to the recipe of the parent product).

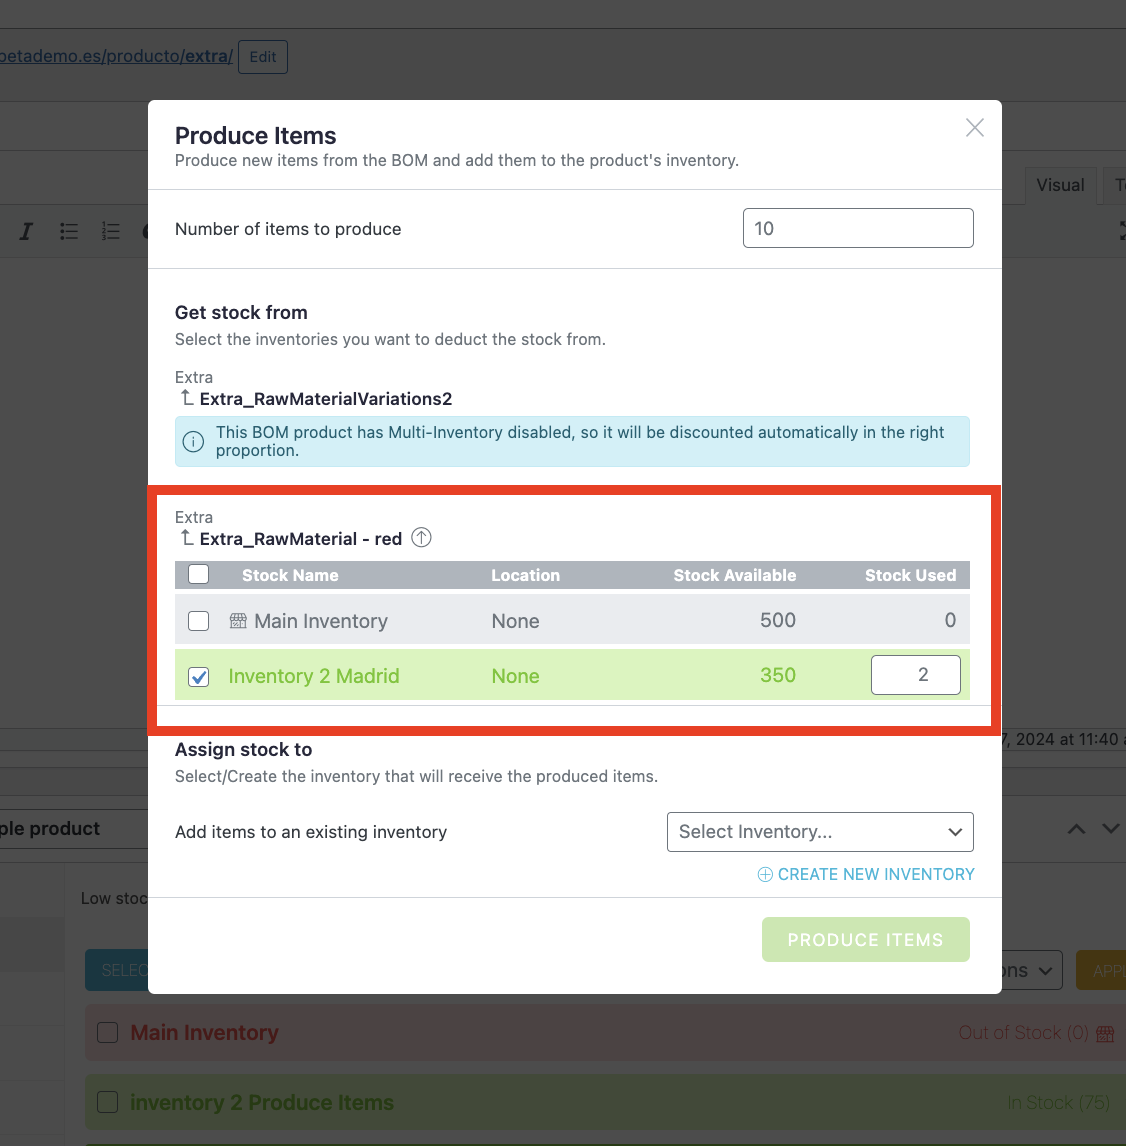
If multi-inventory is enabled for some of the linked BOMs, select the inventory from which you want to deduct the stock.
Scroll down if you don't see all the information in this section.
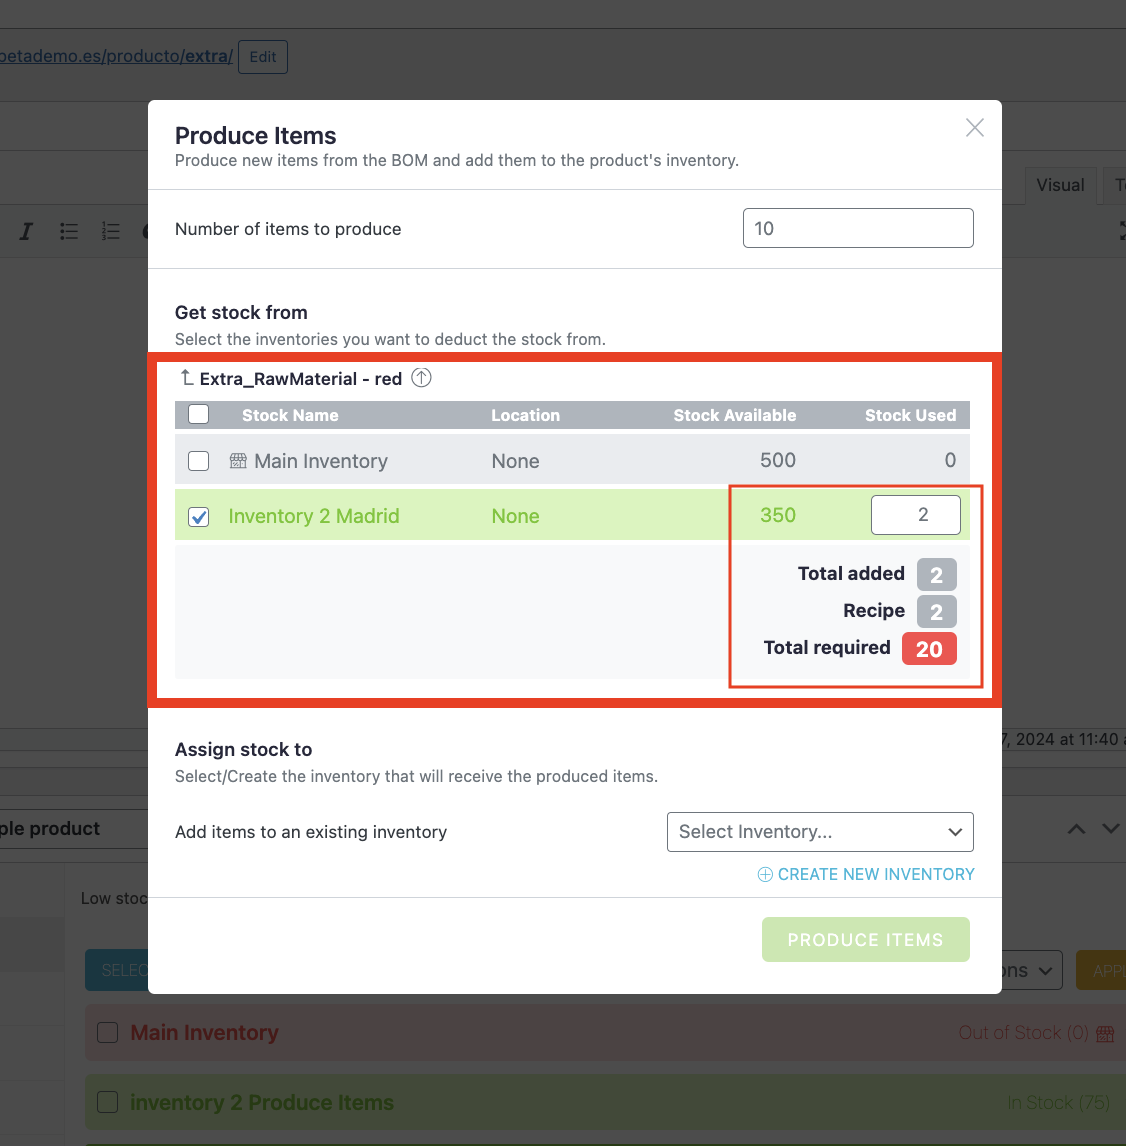
Enter the number of BOM items required to produce the number of the parent product items specified at the top input field. The system automatically calculates the total items required. Once the total added number equals the total required, the background color of the total required changes from red to green. This signals the user to continue to the next step.
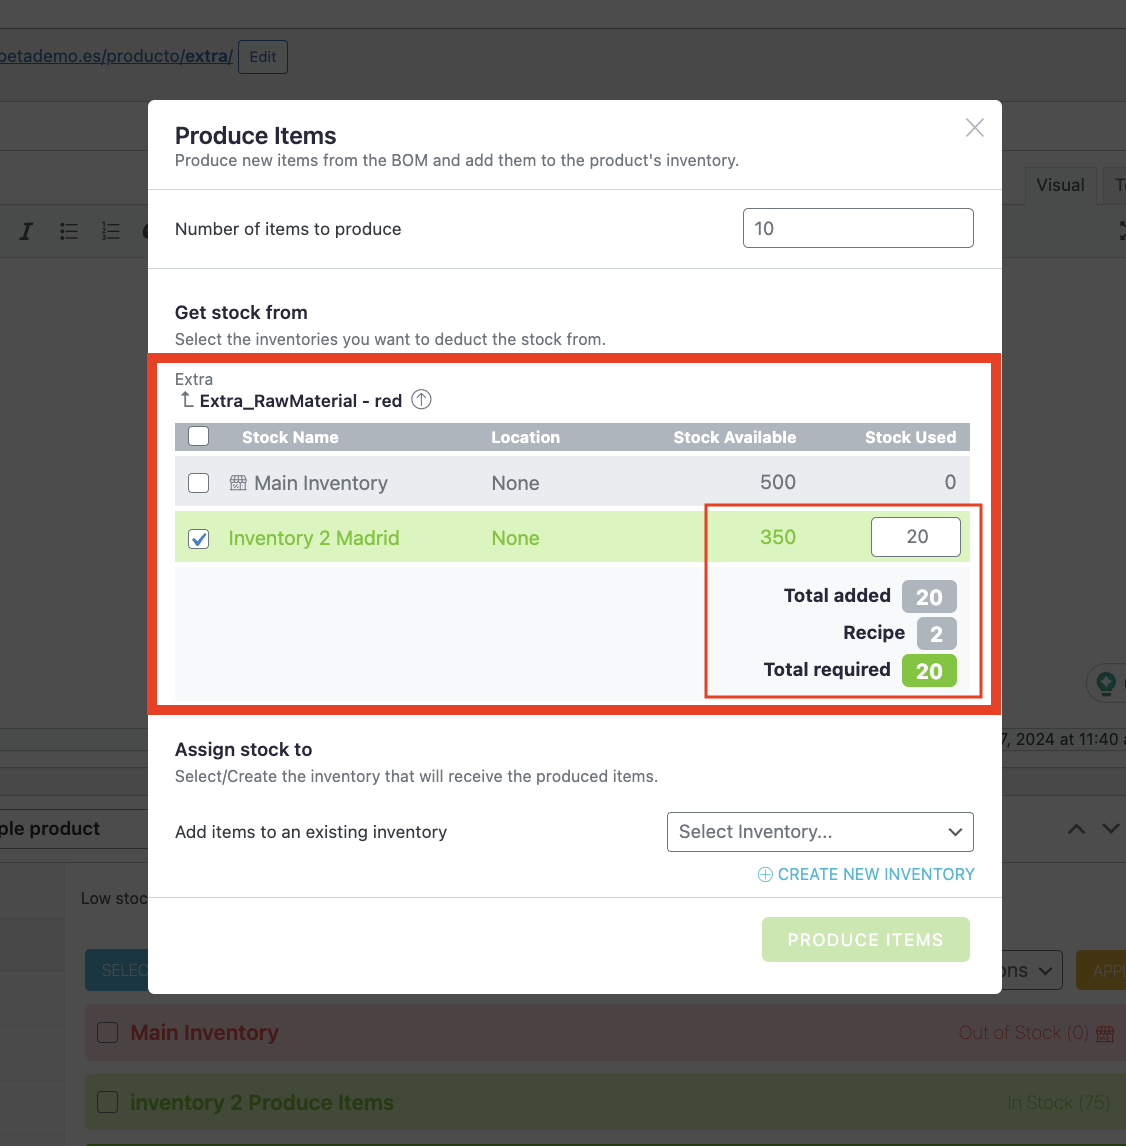
This process must be repeated as many times as the product has a linked BOM.
Scenario 2.1
If Multi-Inventory is enabled for the parent product, you will see the "Assign stock to" section at the bottom of the pop-up.
Finally, we must assign the inventory to which we want to add the produced units. We also have the option to create a new inventory.

If you want to assign the stock to an existing inventory, click the dropdown “Select Inventory...” and choose the desired one.
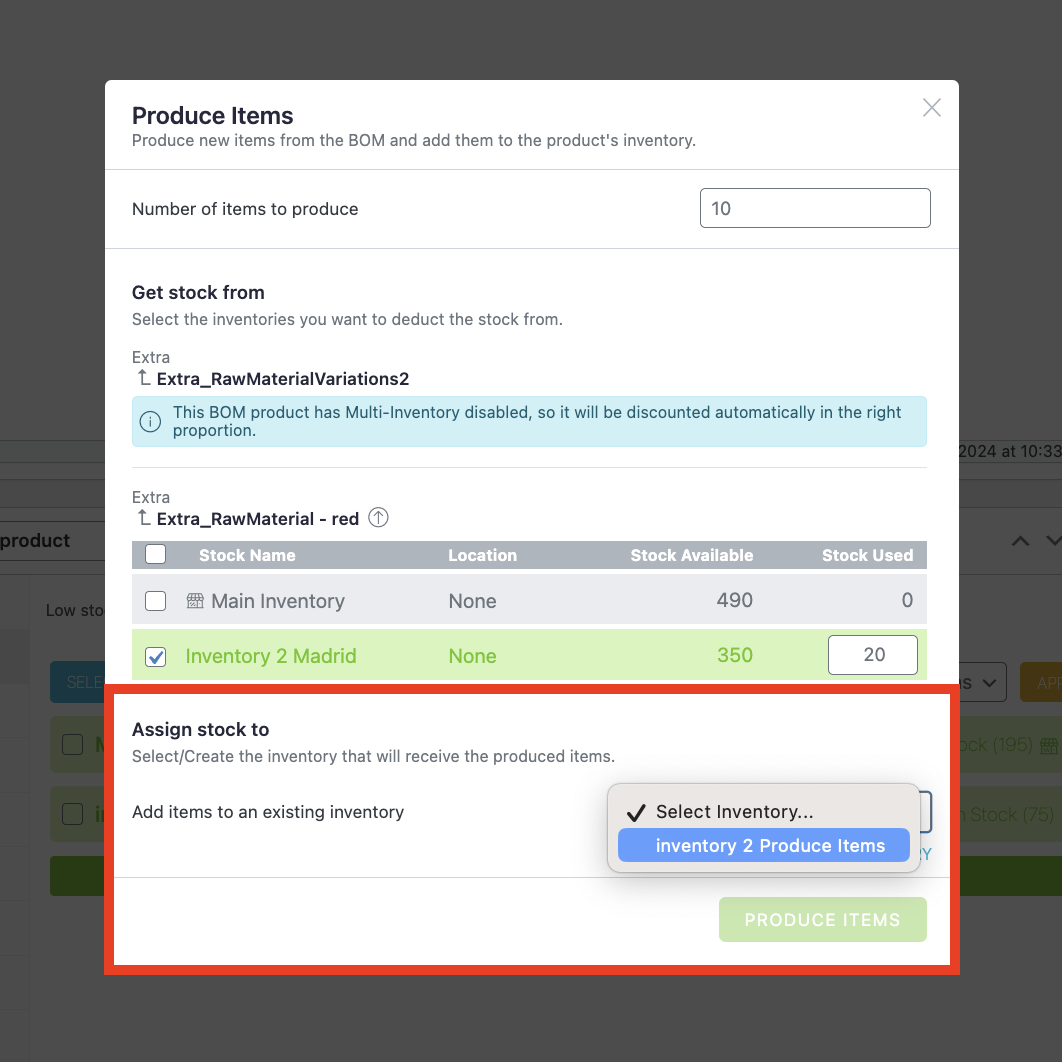
When the destination inventory is selected, the "Produce items" button becomes active and can be pressed to complete the process.

When the “Produce items” button is clicked, a new pop-up appears and indicates that the items have been successfully produced.
Scenario 2.2
Assign stock to a new inventory
If you need to create a new inventory to assign the new items produced, follow the steps below:
Select “Create new inventory” in the “Assign stock to” section.
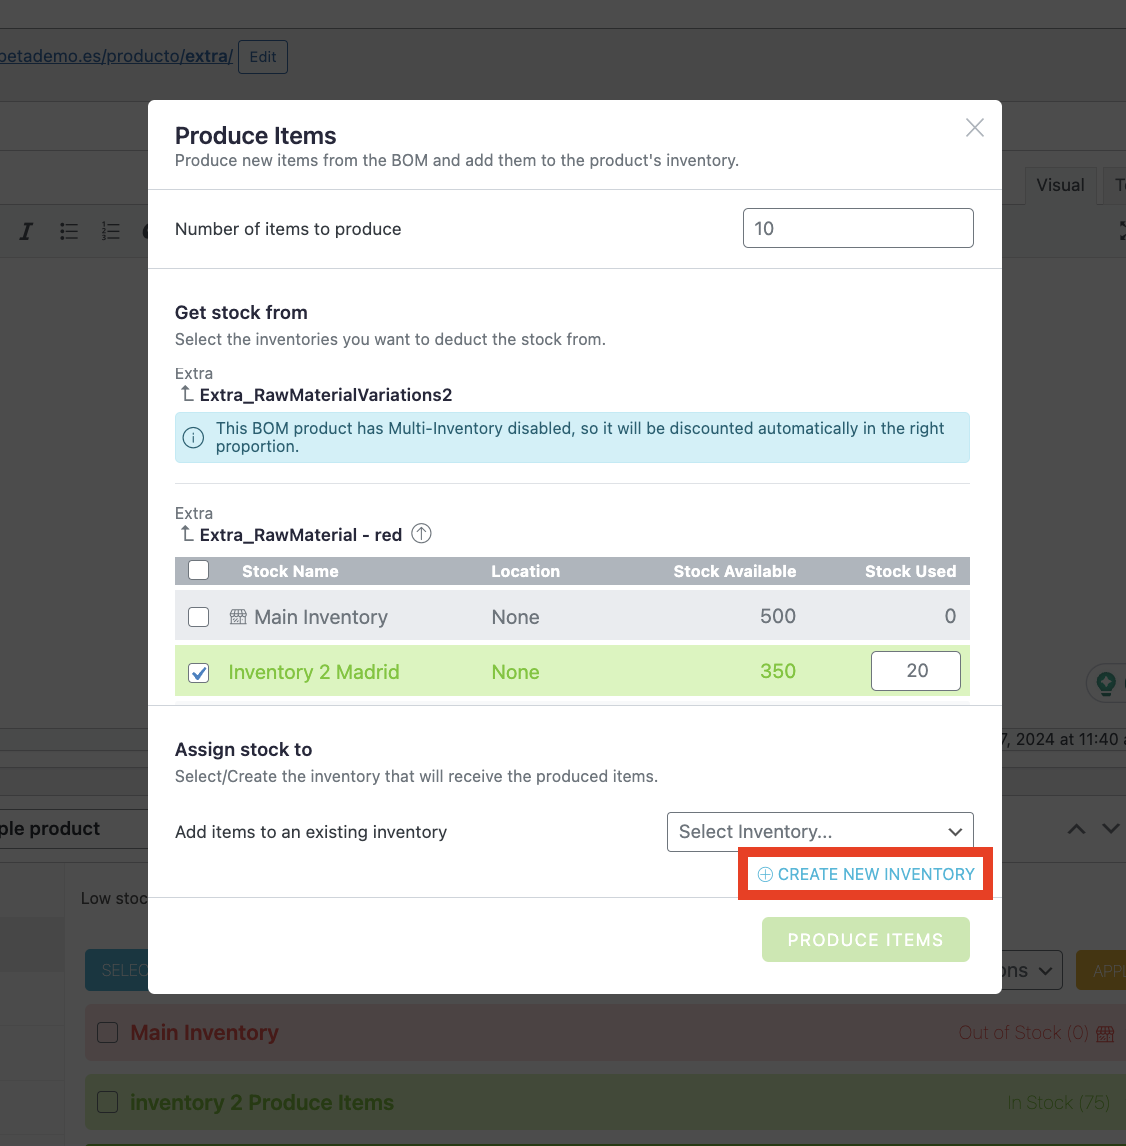
New fields will appear automatically and must be filled in with the required information.

Only the inventory name is required and must be unique. All the rest are optional.
Later, you can complete its configuration from the product page (if necessary).

The process is ready for completion if the “Produce Items” button is active.
Click the button and the confirmation pop-up will appear.
Scenario 3
A site with the "Produce items according to BOM" enabled and the "BOM stock control" disabled. And also, the Multi-Inventory add-on installed and active and active on the parent product too.
In this case, the stock of the parent product will be manual (not calculated) and detached from its BOM tree's stock.
This means that if we produce a new item, we can also use the Main Inventory as the destination.
Scenario 4
A site with the "Produce items according to BOM" enabled and the "BOM stock control" disabled. And also, the Multi-Inventory add-on installed and active and disabled on the parent product.
In this case, the "Produce Items" button appears in the Bill of Materials tab in the product data section.
If you click the Produce Items button, the following pop-up displays:
Produce Items from Stock Central and Manufacturing Central
In both lists, locate the product you want to produce and click the three dots displayed at the end of the product’s row (within the row actions column).
If that product has linked BOMs and adjusts to any of the scenarios above, the “Produce Items” option should appear on the popover menu shown.
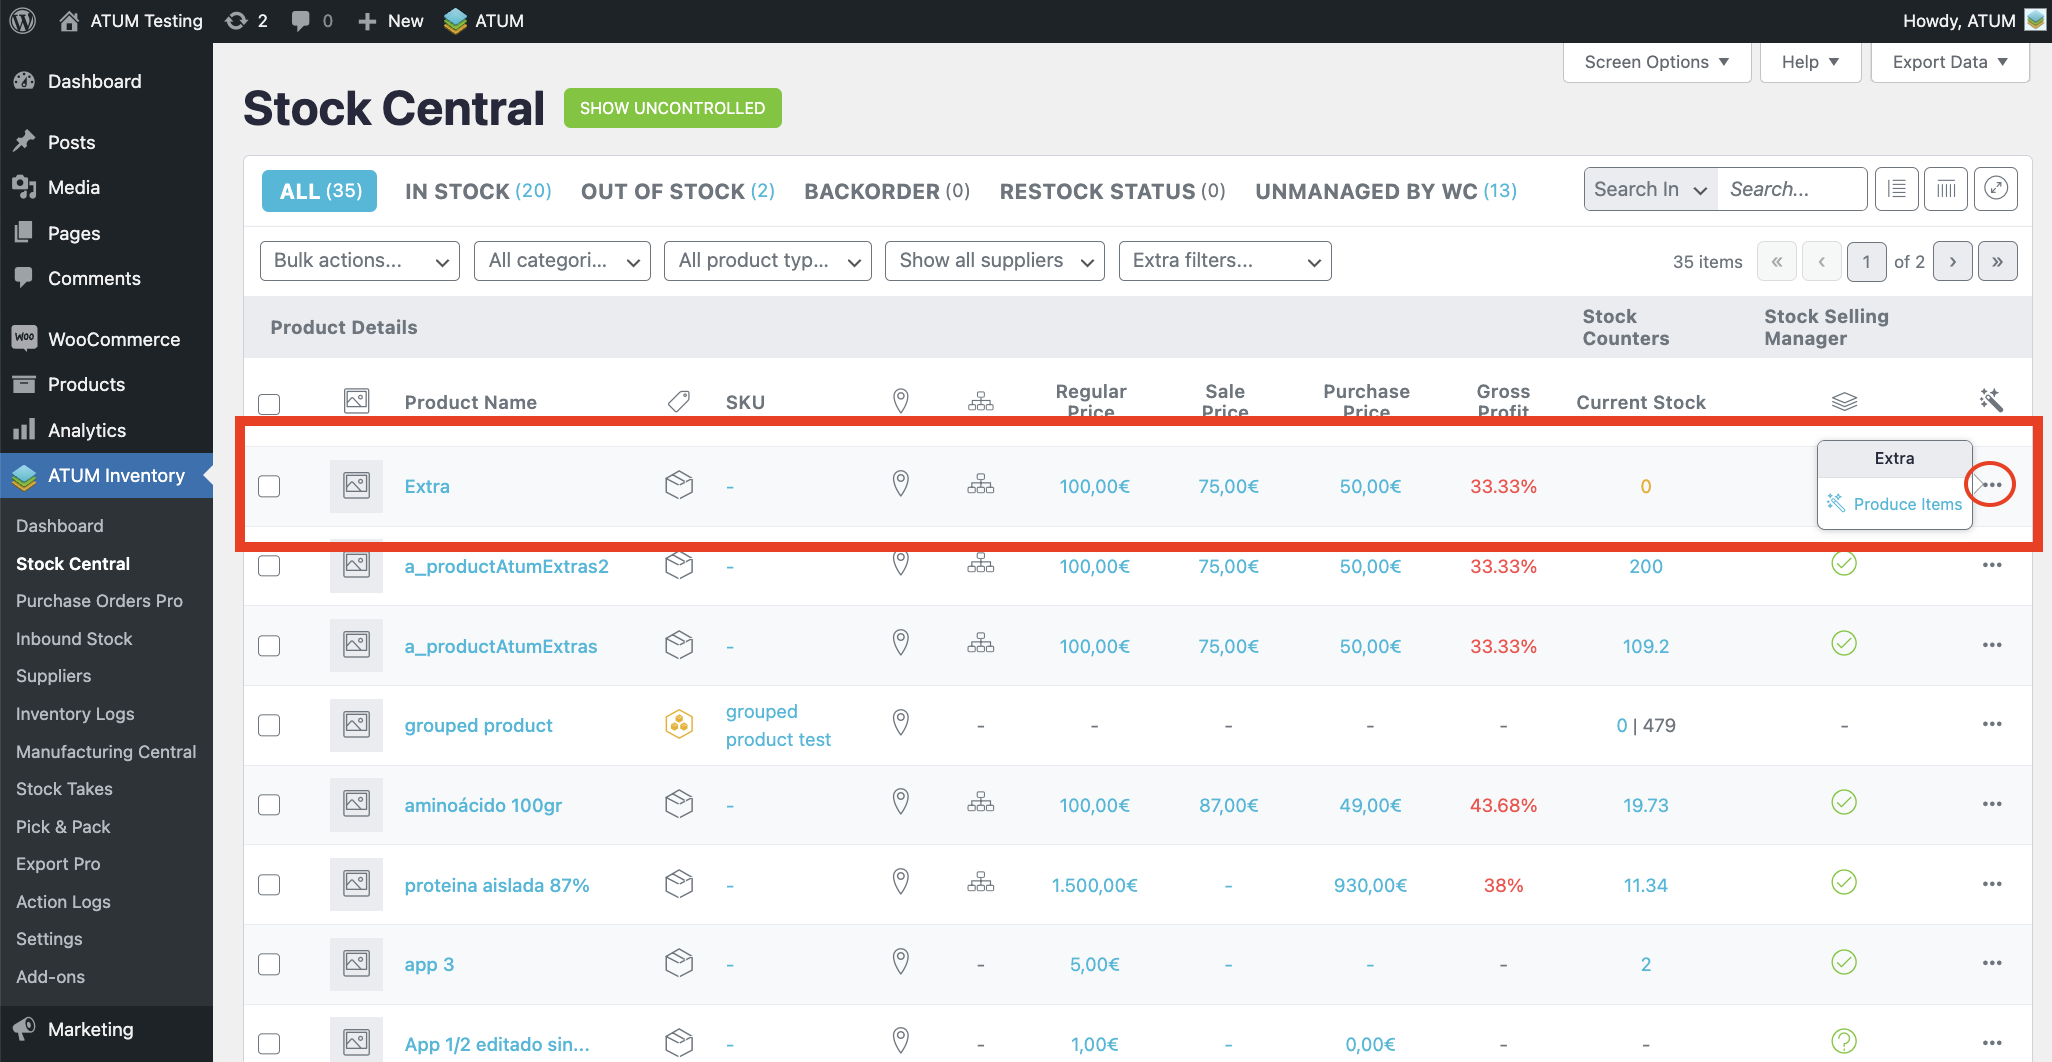
Clicking “Produce Items” will display a pop-up according to the different scenarios described above.
Simply fill in the different sections according to your needs.
Finally, clicking the active button “Produce Items” displays a confirmation pop-up for successful production.
Pressing the “OK” button automatically produces the items, and reloads the table.